Commissioning a mosaic
If I am working with you (my potential client) on a commission, I begin by trying to get an idea of what you are looking for. Checking my web site for examples of my work is a good place to start. If you already have a concept in mind, anything you provide me with can be helpful.
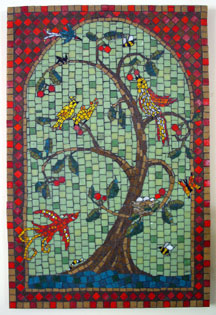 |
For example, the first inspiration for the 'Tree of Life' mosaic was a 1" square image of a tree cut out from a newspaper along with the idea 'tree of life'. I researched early American Applique books and borrowed from their naive folk art style to depict the elements in this mosaic. The colors were chosen to compliment the room in which it was to be placed.
|
I am very open to new directions and encourage people to realize that just about ANYthing can be translated into mosaic! (one of these days I want to try some dinosaur imagery).
|
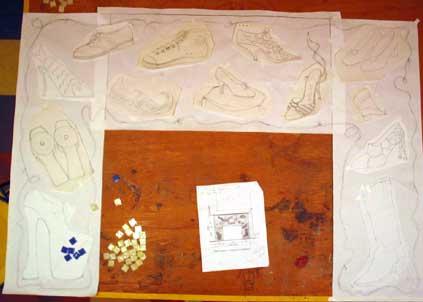
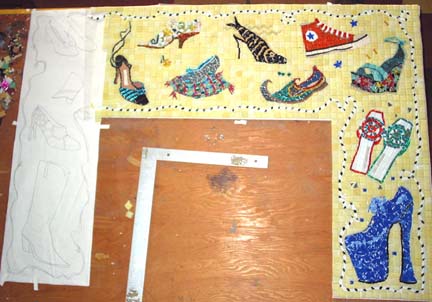
One of my favorite parts of creating art is the sketch phase, when anything is possible. Once a theme is decided, I may do a few thumbnails but in general I like to sketch at full size. When the pencil drawing is complete, I tighten up the line work and this is what the mosaic tesserae or tiles will be laid upon. The image here depicts a shoe fireplace surround.
|
 |
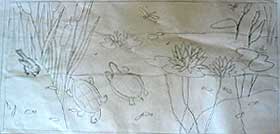 |
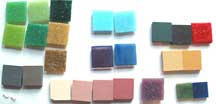
Rather than do a color sketch with paints or colored pencils, I prefer to work my colors out with the tesserae themselves. Mosaic colors don't match up very well with markers, paint, or colored pencil. I find the best way to get a feel for the look of the final piece is to loosely 'sketch' with the mosaic tiles. Working this way keeps the tile laying process more fresh and responsive. I supply my clients with a pencil sketch and chosen color palette of actual tiles to be used. Images here are for Two Turtles, which can be seen in poolside mosaics.NEW WORK
|
|
|
| Most of my mosaics are laid in the 'indirect' or 'reverse' method, allowing me to create the mosaic in my studio rather than on site. The temporary substrate for the mosaic is usually a sheet of clear adhesive, more fondly referred to as 'sticky paper'. This is placed on top of the sketch. I then start nipping and placing tiles. Using this temporary substrate allows me to make changes as I go along and this flexibility is great. Note the sketch is backwards from how it will appear when complete. |
 |
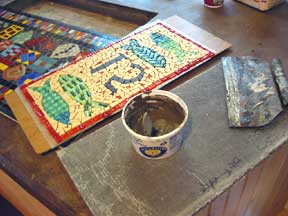
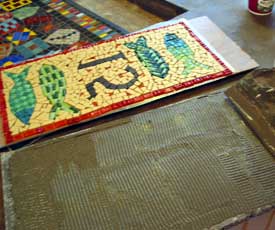
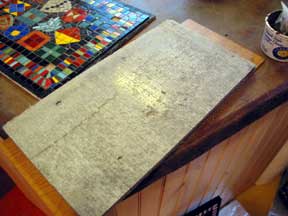
The next step is to change substrates (1.). My favorite permanent substrate is 1/4" cement backerboard. Thinset is applied with a notched trowel to this surface (2.)and it is placed on top of the upside down mosaic (3.). A sandwich is made of board/sticky paper/mosaic/thinset/cement board and the whole thing is FLIPPED. (Two people are required for any larger sized mosaic.) A piece of plywood is used to firm in the tiles and allow uneven tiles to stay at same height (4.). The mosaic then sits until thinset solidifies enough to remove the sticky paper. After 24 hours the mosaic is grouted(5.).
 |
 |
 |
|
1. ready to attach
|
2. thinset applied with notched trowel
|
3. thinset board dropped ON mosaic
|
 |
 |
| 4. after flip, plywood used to firm in mosaic tiles to adhesive(sticky paper still on) |
5. grouted mosaic |
If you are 'trying this at home' feel free to contact me with any questions!
CAVE CANEM FACELIFT
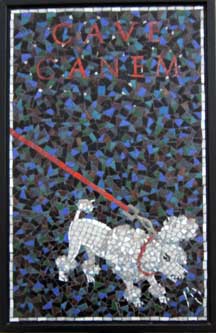 
Recently I decided to overgrout the poodle (affectionately known as 'Fang') in this mosaic using Laticrete's SpectraLOCK grout. Not so easy to tell from these images, but Fang and his menacing glare pop out a bit more now. Featured in a MOSAIC ART NOW youtube clip , check it out!
|